


Canadian visa fingerprinting or Canadian biometrics is a process in which the applicant’s fingerprint information is recorded by a digital scanner and his/her face is also photographed. The Canadian immigration officer uses this information to verify the identity of people. Most people who apply for all types of Canadian visas must go through the fingerprinting process.
If you are applying for one of the types of Canadian visa online, you must also pay the biometric fee at the same time as you pay the application fee. After submitting the file, a letter called Biometric Instruction Letter will be sent to you, using which you should apply for fingerprinting.
Who should be fingerprinted by the Canadian Embassy?
If you want to apply for the following types of visas and permits, you need to do the fingerprinting of the Canadian Embassy:
- Visitor visa
- Work permit (except for American nationalities)
- Master’s permit (except for American nationalities)
- Canadian permanent residence
- Extend the period of stay in Canada
- Extend work permit or master’s permit
- Asylum or waiting for a decision on the outcome of the asylum application
- However, due to the corona pandemic and the restrictions placed on VAC centers and many of them closed, you are currently exempt from fingerprinting if you have the following conditions:
You have submitted or are in the process of submitting your application for one of the following:
- Extending your stay in Canada as a student, worker, or visitor
- Reinstatement or restoration of status as a student, worker or visitor
- Applying for a teaching permit or work permit
- Apply for a visitor visa
- Applying for a Temporary Resident Permit (TRP) in Canada
- This law may be removed in the future after the complete cessation of the Covid-19 disease, and according to the previous procedure, visa applicants inside Canada must also be fingerprinted. We have to wait for new updates from the Canadian Immigration Department in this regard.
Who are exempted from doing biometrics at the Canadian embassy?
-
- Canadian citizens, citizenship applicants (including passport applicants) or permanent residents of Canada
- US citizens or US green card holders
- Citizens of countries that are visa-exempt to visit Canada
- Children under 14 years old
- Applicants who are over 79 years of age (there is no such exemption for asylum seekers)
- Heads of state and government
- Applicants who have diplomatic visas or official visas or applicants who are eligible to receive these types of visas
- American visa holders transiting through Canada
- Asylum claimants or protected persons who have already been fingerprinted and are currently applying for a study permit or work permit
- Temporary residence applicants who have already applied for Canadian permanent residence biometrics and their application is being processed
- Members of the royal family
Immigration, Refugees and Citizenship Canada or IRCC collects the following information from you during the biometric session:
Biographical information:
- name, date of birth, and other personal information based on passport or travel documents
10 fingerprints: using an electronic fingerprint registration device
Photo: Digital photo of the face
- name, date of birth, and other personal information based on passport or travel documents
-
- Do not have tattoos or henna on your hands for fingerprinting.
- If your fingers are injured, cut or cracked, allow them to heal before fingerprinting.
- Avoid wearing neutral colors such as white, gray, cream, silver, and instead use specific and bold colors such as red, yellow, orange, or green.
- When taking a photo, if wearing a headscarf, the entire face must be clearly visible.
If your fingerprint is not high quality, you may be asked to repeat the fingerprinting process.
-
- Type of request Cost in Canadian dollars
Fingerprinting per person $85
Fingerprinting per family (2 people or more) $170
Fingerprinting per group(3 or more performing artists) $255
What is the age of Canadian visa fingerprinting?
Canadian visa biometrics is mandatory for Iranians and nationals of some other countries between the ages of 14 and 79. These people usually intend to apply for temporary residence, permanent residence, or extension of any of Canada’s temporary residence visas. The applicant’s age is calculated based on the time the visa application is received by IRCC.
Canadian fingerprinting centers
In order to be able to do your fingerprinting process, you must first make an appointment at one of the visa application centers under the supervision of the Canadian Embassy, called the Visa Application Center – VAC. Unfortunately, due to the closure of the Canadian embassy in Iran, for this purpose it is necessary to take a biometric appointment at one of the VOC centers in neighboring countries of Iran.
Below is the list of VAC centers for Canadian fingerprinting with addresses and phone numbers.
Canadian Biometric appointment booking has several steps. By following the steps that we explain below, you can take a fingerprint appointment yourself easily and without the help of others and paying additional fees.
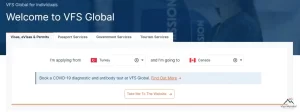
S1: Log in to the VFS Global website.
In the rectangle on the left (I’m applying from), select the name of the country where you intend to be fingerprinted. Note that you should not choose Iran because VAC centers are not active in Iran.
In the rectangle on the right (and I’m going to), select the destination country, Canada.
In this tutorial, we select Turkey and then click the Take Me To The Website button:
S2: On the opened page, in the Book and appointment section, click on the Book now option:

S3: On the new page that opens, among the appointment methods, select the Online option and click on View more:
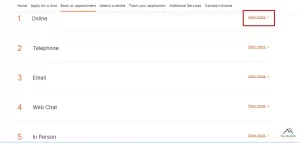
S4: In the opened drawer, click on the option click here in the first line:

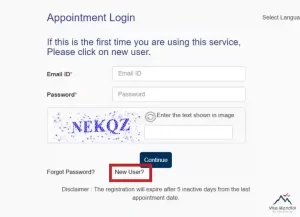
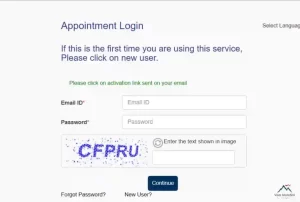
S5: In this step, you need to create an account, so click on the New User option.
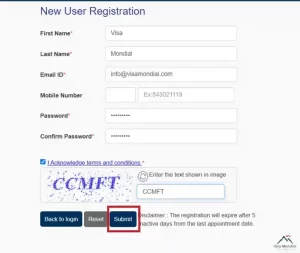
S6:On the page that opens, enter your personal information, email address and password and click on Submit.
Tip: When choosing a password, choose a phrase that is at least 8 characters long and includes at least one uppercase letter, one lowercase letter, number and characters such as *, question mark?, #, etc. In this tutorial, we have used hypothetical specifications.
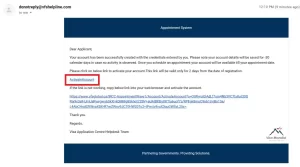
S7:After clicking the Submit option, you will enter the following page at the same time, and the activation link will be sent to you via email.
In the email sent, click on the ActivateAccount option or the activation link you see in the image below.
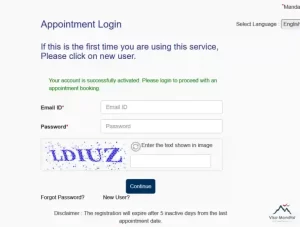
S8:After activating the account, you will enter the following page and it will inform you that the activation is successful.
Next, to log in to the created account, enter the email address and password that you have already specified and the phrases in the image in the specified places and press the Continue button.
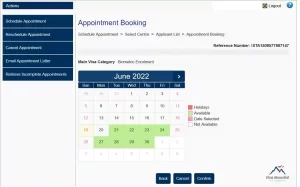
S9: When you log in to your account, you will see the following page, and in this section, you must click on the first option, Schedule Appointment, to determine the fingerprinting time.

In the left row, you will see 4 other items, the use of each of which will be explained below:
- Reschedule Appointment: If you have already taken a fingerprint appointment and want to change it, log in here.
- Cancel Appointment: Use this option to cancel the biometric appointment.
- Email Appointment Letter: If you have lost the fingerprint reservation letter that you will receive in the last step, click on this option to get it again.
- Retrieve Incomplete Appointments: If you have already applied for a fingerprint appointment but have not completed the process, log in here to complete your incomplete application.
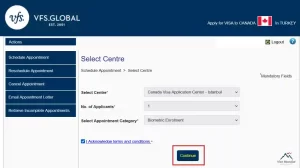
S10:In this step, on the opened page of the desired VAC center, specify the number of fingerprint applicants and the type of service.
Considering that we had previously selected Turkey, in the Select Center section, we specify the Istanbul VAC center (depending on your desire, you can choose the Ankara center).
In part no. of Applicants, we select the number of 1 person, which may be more depending on your conditions;
And in the Select Appointment Category section, we select the Biometric Enrollment option.
Then we tick the rules, i.e. I Acknowledge terms and conditions, and at the end, we click on the Continue option.
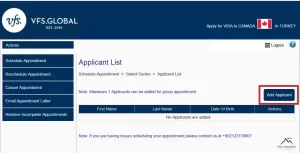
S11: On the new page, by clicking on the Add Applicant option, you must add a new applicant to the number of people who want to do fingerprinting.
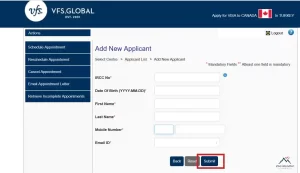
S12: In this step, enter the main applicant’s information and click Submit.
In the IRCC No field, you must write the number that is on the second page of your fingerprint letter (Biometric Instruction Letter).
Then enter your date of birth, first and last name, phone number and email address and click on the Submit option.
If you have already selected 2 or more applicants, in this step, click Submit, click Add New Applicant, enter the details of your companions, and finally click Submit.
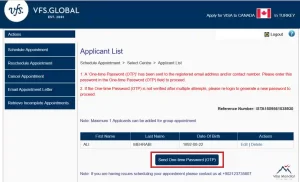
S13: After entering the information of the main applicant, you will receive a Reference Number as shown in the image below.
Then click on Send One-time Password option. A one-time password will be sent to your email, which will expire after 3 minutes.
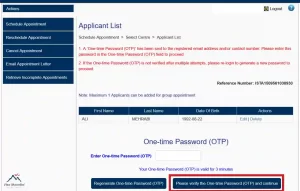
S14: In the received email, copy the one-time password and enter it in the Enter One-time Password field.
Then click on Verify the One-time Password and Continue to enter the next step.
If the received password has expired or you did not receive a password, click on the Regenerate One-time Password option as shown in the image below to send you a new password, and then complete this step according to the previous explanation.
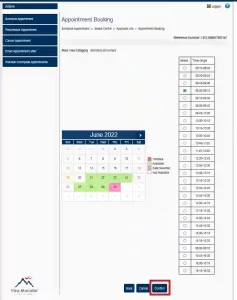
S15: Free times are displayed in the table below
Green cells are open days and you are only allowed to choose these days. You cannot select white cells that are inactive. Red cells also refer to holidays that you cannot select.
S16: Select one of the open dates and click on it. The list of hours for that day is displayed on the right.
Then choose the hour you want for that day and click Confirm at the end.
For example, we have chosen the date June 30, 2022 at 9 am.
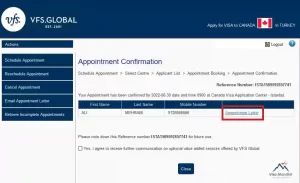
Final step: After confirming the previous step, the following page will be displayed and the appointment booking letter will be issued to you.
As shown in the image, click on the Appointment Letter section and download it. This letter will also be sent to your email.
You can see the issued fingerprint reservation letter, which also contains the Reference Number, below:
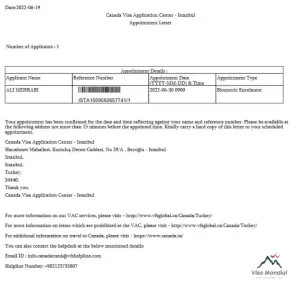
With the issuance of the fingerprint letter, your time is set and you must visit the desired office on the specified date and time. Also, on the day of fingerprinting, in addition to the time reservation letter, you must also bring other documents with you, which we will mention in the rest of the article.
It usually takes from one day to several months to determine the answer to the Canadian visa after fingerprinting. The Canadian Embassy reviews applications randomly and not in chronological order, and for this reason, it is not possible to name an exact time period for issuing a Canadian visa.
In addition, on the website of the Canadian Immigration Department, at different times, a different period of time for reviewing visa cases is announced, which does not necessarily always proceed according to those dates.
Also, factors such as the busyness of the embassy, the type of visa application, the country from which you applied for the visa, or the case going to the background check may prolong the time it takes to announce the result of the visa.
After Canadian fingerprinting, you can enter your visa account on the Canadian Immigration website by entering your username and password and check the status of your visa file every day in the check full application status section.
Visa processing times are different, and as we mentioned in the previous section, it may take from a few days to a few months for a Canadian visa to be processed. If the answer to your visa case took too long and was more than the normal time for reviewing visa cases, then you can follow up on the Canadian visa answer in two ways: 1. Sending web form and 2. Correspondence with a Canadian Member of Parliament (MP).
1. Submit a web form
The web form is a tool for submitting an online application, one of its uses is to track the Canadian visa response, and you must include the type of visa application, personal information, UCI Number and Application Number (which was sent to you when you submitted the file), and the text of your application. Write to follow the visa result.
Since the visa application of Iranians is reviewed at the Canadian Embassy in Ankara, so to send the web form, you must correspond with the Canadian Embassy in Ankara and proceed through the IRCC Webform – Ankara site.
After submitting the web form, an email confirming the receipt of the request will be sent to you. At this stage, you should wait for the embassy’s response or they may not respond and directly update your visa portal and post the visa result there.
2. Correspondence with a member of the Canadian Parliament
If the first way was not successful and the status of your visa case is still unclear, then you can correspond with a member of the provincial parliament where you are going to settle later and explain the conditions of your visa case to him.
To select the person you want, you can refer to the Parliament of Canada page and correspond with him using the email address of the member of parliament of the desired province.
Members of Parliament cannot interfere in the result of the visa application, but according to their position and position, they can speak directly to the Canadian Immigration Department and follow up the process of your visa case from them. Following them can have a positive effect on the process of reviewing your visa case and speed it up.